Monday, May 12, 2008
Thursday, May 1, 2008
Tuesday, April 29, 2008
References
1. "Do The Rot Thing: A Teacher's Guide To Compost Activities"
Alameda County Waste Management Authority & Alameda County Source Reduction and
Recycling Board
777 David Street
CA 94577
Website: www. stopwaste.org
2. Florida Backyard Composting Tutorial and Information Website
Sarasota County Government
Website: www. compostinfo.com
3. Papers present by:
a. Ms Sonia Mendoza at the Second GAIA Global Meeting 2003
17 - 21 March, 2003, Penang, Malaysia
b. Mother Earth Unlimited, Philippines
38 Highland Drive, Blue Ridge, Quezon City,
Philippines
4. Centre For Environment, Technology And Development malaysia (CETDEM)
P. O. Box 382, 46740 Petaling Jaya
Kuala Lumpur
Malaysia
Website: www.cetdem.org.my
Troubleshooting
Compost piles using only biodegradable plant material usually do not stink or attract vermin. However, biodegradable material consisting of food scraps may pose a problem if not handled correctly.
Problem 1:
Compost pile stinks and attract flies
Cause:
1. Food scraps are exposed.
2. Too wet or too much food scraps in pile.
Solution:
1. Cover food scraps with soil or bury and mix it into the pile.
2. Add more soil or browns and turn pile.
Problem 2:
Pile infested with eodents and vermins
Cause:
Exposed food scraps or holes largwer than 1/4 inch.
Solution:
1. Cover the exposed food scraps.
2. Use rodent proof bins or containers or traps and baits.
Problem 3:
Compost process is slow or not composting.
Cause:
1. Too dry
2. Too much browns
Solution:
1. Add water until moist and mix thoroughly.
2. Add more greens or organic fertilizer or manure and mix thoroughly.
Composting Systems - continued

9. Vermicomposting (Composting With Worms)
Vermicomposting is a process of using worms to produce rich compost from kitchen wastes.
Vermicomposting is a good alternative if you live in an aprtment or if you generate mostly food scraps.
The best diet for your worms are food scraps that are of plant origin.
This includes vegwetables and fruit trimmings, coffee graounds, bread, cereal, tea bahgs and other paper products.
Animal products such as meat, eggs, cheese, etc are discouraged or best kept to a minimum to prevent odour.
Making A Worm Bin
Materials
- Plastic or stryrofoam containers with lid
- Window screen
- Duct tape
- Newspaper, shredded paper or paper-board
- Water
- A hand-full of sand or soil
- Electric drill with 1 inch spade bit
- 1/2 - 1 kg worms (2,000 - 4,000 worms)
Commercial worms that are commonly used for vermicomposting are Tiger Worms (Eisenia foetida), Malaysian Blueworm (Perionyx excavatus) and African Nightcrawlers (Eudritus eugeniae).
Worm Bin Construction
1. Drill holes either on the top or sides of container.
2. Drill at the bottom of the bin to ensure good drainage of "compost tea". a nutrient rich liquid which is a by-product of the decomposition process.
3. Collect this liquid to use as a foliar fertilizer or used as normal fertilizer.
4. Cut small pieces of screen to cover the holes and tape them to the inside of the bin using duct tape. This is to ensure that other vermins such as cockroaches, ants and other inscests do not enter the bin.

Bedding
1. Bedding is a very important aspect of vermicomposting.
2. Make the bedding by shredding paper lengthwise into 1 inch strips to fill the bin 1/3 full.
3. Spread sand or soil over the bedding.
4. Pour water over the newspaper strips; stirring the bedding as you moisten it.
5. Dump worms out of containers onto surface of the bedding.
Caring For The Worms
1. DFeeding: 1 kg of worms can process 1/2 kg of kitchen scraps a day. Feed them daily, weekly or as desired.
2. Cutting kitchen scraps into small pieces allows the worms to consume them faster.
3. Bury the scraps under the bedding; rotate where you bury them. You may add more bedding every once in a while.
4. Temperature: The ideal temperature for worms is between 15 - 26 C (60 - 80 F). Therefore, place the bin in a shady area but not under direct sunlight.
5. Moisture: Check the moisture when adding kitchen scraps. If too wet, add more bedding; if too dry, add water. Worms like moisture.
6. Darkness: Keep the lid on your bin. Worms do not like light and the colsed bin will not attract flies.
Harvesting
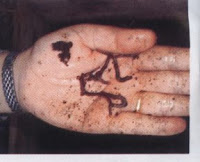
After 2 - 3 months, the worms will have digested the bedding and food scraps into a rich, dark compost. Thre are two ways to harvest it:
1. a. Push the compost to one side of the bin and fill the empty side with
moistened, shredded newspaper.
b. Place kitche scraps into bedding.
c. The worms will eventually leave the compost and migrate towards the food.
d. The compost can then be removed.
2. a. To harvest both the worms and the compost at the sme time, empty the contents
of the bin into a pieces of plastic sheet.
b. Allow the worms time to retreat to the middle of the pile away from the light,
then scrape off the outer layer of compost.
c. Repeat this process untill all the compost is harvested and mostly worms are
left.
Composting Systems - Continued

7. Windrow Composting
Materials
- Small branches or twigs
- Hollow blocks
- Hollow tube with hole (plastic or bamboo)
- Gunny sacks
- Kitchen waste
- Sawdust or wood chips
- Water
- Shovel
Method
1. prepare "batas" windrow by laying the hollow blocks in rectangular shape.
2. Prepare heaps by laying waste material into the "batas".
3. Make a 10 inches depression inside the heap to prevent water/leachate from escaping. This is to avoid unpleasant odours while composting, especially dureing the rainy season.
4. Put the shredded biodegradable waste inside the compost heap.
5. Cover with soil, at least 3inches thick.
6. Top with sawdust (available from lumber yards) to absorb excess moisture.
7. Cover the compost heap with gunny sacks that have been sewn together. The sacks will maintain heat for faster decomposition of waste.
8. Insert plastic tubes (3 inches diameter) or bamboo tubes to release methane gas and for oxygen.
9. Leap heap covered for 45 - 60 days. then harvest.

8. Bottomless Bin Composting
Materials
- Empty bin or suitable container with cover
- Kitchen and garden waste
- Soil
- Water
- Shovel
Method
1. Remove the bottom of your bin or container.
2. Drill holes in bin or container for aeration.
3. Turn the bin or container upside down and place it in a well-drained position.
4. Lay the bottom with 7 - 8 inches of browns comprising of dried leaves or garden materials.
5. Add kitchen waste to top for 3 consecutive days, then cover with a thin layer of soil or dry grass.
6. Keep adding until bin is full. Cover the bin. If your compost heap is too dry, then sprinkle some water to keep it moist.
7. After 1 - 2 weeks, remove the bin jacket and turn the compost either back to the same bin or a 50 - 70 kg sugar sack to store the compost.
8. Turn the compost 3 - 4 times and leave it to mature for 3 - 4 months.
Subscribe to:
Comments (Atom)
